The article explains manual and magnetic reference lines in Coffee Table Book design. Manual lines, activated via rulers, help precisely align elements and appear as dashed white lines that don’t print. They snap photos and text boxes for consistent layout across pages and can be repositioned or deleted. Magnetic lines dynamically appear when moving elements close to others, snapping edges or centers for easy alignment. This snapping feature is enabled by default but can be toggled off via the Edit menu.
MANUAL REFERENCE LINES
Reference lines are designed to simplify the layout process of your Coffee Table Book. They allow you to place and align elements with precision. In the design view, reference lines appear as dashed white lines across your Coffee Table Book but will not be printed.
To use reference lines, activate the rulers via “View” → “Show rulers.”
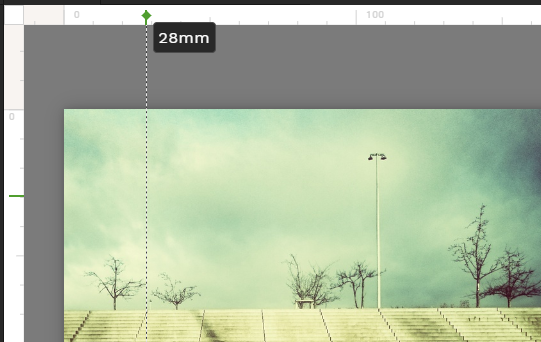
You can then use any number of horizontal and vertical reference lines. To insert a vertical reference line, click on the ruler on the left side and drag the mouse pointer onto your Coffee Table Book while holding down the mouse button. A dashed white line will appear, which you can position anywhere on the page. A small box at the top of the reference line will display its exact position, indicating the distance from the left edge.
Release the mouse button to place the reference line.
At the top end of the reference line, you’ll see a diamond-shaped symbol. If you hover over it with your mouse, it will turn green. Once it turns green, you can click and drag to reposition the line at any time.
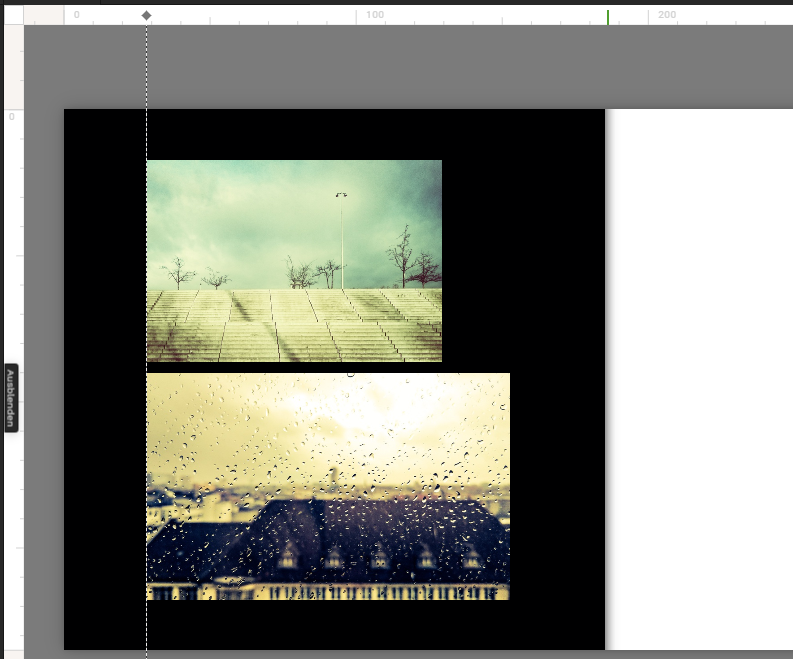
If you drag a photo close to a reference line, it will “snap” to it, aligning exactly with the line. This makes it easy to align multiple photos vertically or horizontally.
Text boxes can also be aligned using reference lines in the same way.
Another major advantage of the reference is that manual reference lines are visible across all double pages in your Coffee Table Book (except the cover which is handled separately), helping you maintain a consistent design throughout. For example, it helps you ensure that your photos or headlines are placed uniformly from page to page.
To delete a reference line, click on the diamond-shaped symbol at the top of the line and drag it back onto the ruler. Once released on the ruler, the line will be removed.
MAGNETIC REFERENCE LINES
When you move a picture or text box, so-called magnetic reference lines may appear based on the position of other elements. Similar to the manually placed reference lines, they help you align elements accurately. However, these lines are dynamic and not fixed to a specific location.
For example, if you’ve already placed a photo on a double page and add another one, you can drag the new image toward the existing one. When their edges or centers nearly align, a dashed line will appear—an extension of the existing image’s edge. The photo you’re moving will snap into place accordingly.
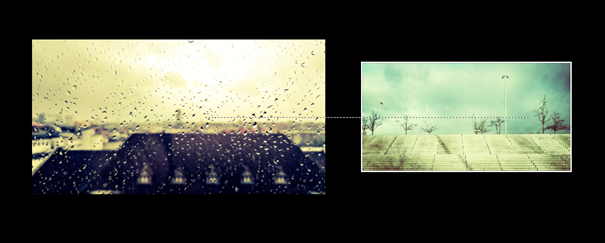
This applies to both the edges and centers of images. The same principle works with text boxes or a combination of photo and text boxes, making alignment across a double page simple and efficient.
This feature is enabled by default.
However, if you prefer to work without the snapping effect—for example, when precise alignment isn’t required—you can easily disable it via “Edit” → “Snapping” by unchecking the box. You can turn it back on the same way.